Sunday 29 December 2013

BFG 1500: Tau (Pax Arcadian) vs Chaos

Another game with Jesse today. I used my Pax Arcadian from Dark Realm Miniatures (counting as Tau), and he used his Chaos. We used BFG revised rules again. 

My Tau list was:
  • 2x Explorer Battleships with Tau Kor'O Commander
  • 3 x Hero Cruisers
  • 5 x Defender Escorts
  • 3x Orca Escorts
  • 3x Orca Escorts

Jesse's Chaos list was
  • 1x Hades Heavy Cruiser with Commander, 2x Murder Cruisers
  • 1x Hades Heavy Cruiser, 1x Murder Cruiser
  • 2x Slaughter Cruisers
  • 3x Infidel Escorts
  • 2x Infidel Escorts


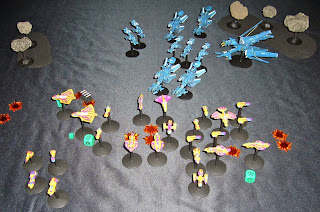
The scenario is a "Surprise Attack". This begins with the Chaos Fleet hanging out around a moon having breakfast or something, when suddenly my Tau fleet jumps in to provide a lesson in the "Greater Good"! Three Chaos squadrons to the left of the moon are on standby, two on the right are on alert. There are also 21 orbital mines in a rough half circle around the Chaos position.

My plan is to jump in and do as much damage as I can immediately, sending in the fighters to take out the mines and then quickly reloading and following up with bombers. My fleet has 22 launch bays (8 each on the Explorers, and 2 each on the Heros), which I will need to make the most of in this game. 

My Tau jump in a line with Orcas, Defenders, Heros and Explorers from left to right. Everything except the Orcas locks on, and blasts the closest Murder Cruiser down to 1 damage point and sets it on fire. My fighters knock out the first six mines, the Orcas shoot down another. The Murder fails to put the fire out and explodes - but sadly does not damage any of the other ships.

The Chaos pass their leadership checks and come to alert status, beginning to swing around towards the Tau line. They destroy an Orca, and do some other minor damage. Another Orca is destroyed by a mine that gets too close (oops). My fighters take out another 7 mines. A flight of 6 bombers heads towards the Slaughter Cruisers.

Next turn my Explorers reload having to use the reroll, and send out another 3 fighters to deal with mines and 13 bombers headed for the Slaughters. The Heros fail their command check. I destroy a Chaos escort, but the rest of my firepower does little. The six bombers launched the previous turn make it to the Slaughters, as do some torpedoes from the Heros, but they do only minor damage as they Slaughters have braced for impact.

The Chaos close in destroying Tau escorts and crippling a Hero despite it bracing. They also shoot down two Tau bomber flights, and the last flight does no damage in its attack run. (Note a few Tau homing missiles behind the planet coming back around for another pass!)

My turn and a disaster occurs as I fail the reload order with the Explorers! That's 16 bombers doing nothing, and the Chaos escape the turn taking little damage.

Chaos turn and they close in for the kill, crippling the first Explorer, and teleporting and destroying a Defender after knocking down its shield.

My turn and I retaliate destroying the first Slaughter and a Chaos Escort.

Chaos turn, they swing around targetting the Explorers again, and dropping the first one to a single hit point despite me bracing for impact. They also kill my last two Orcas.

My turn I disengage with the crippled Explorer and reload with the Heros, finishing off the second Slaughter with close range rail gun, ion canon and shotgunned torpedoes.

Chaos turn and my remaining waddling Explorer takes stern and bow rakes from the four Chaos Cruisers! Boom! That's too much firepower to resist...

A hit and run teleport also kills a Defender, and another Hero is crippled. My Hero's are now unloaded, two are crippled, and they are unable match the speed and turning arcs of the remaining Chaos ships. I sound the retreat, congrats to Jesse on the win! 

Well it was interesting to use the Tau for the first time. On paper they look ferocious with all those launch bays, but getting those to work right turned out to be trickier than I thought!  Failing reload rolls was bad, I should have bought the extra rerolls perhaps!  The Tau fleet is also quite slow and lacking in maneuverability, a factor aggravated by proximity to the planet, where the Chaos ships made the most of the gravity well to turn around very quickly and blow me to pieces. In hindsight I probably should have held back and thrown out as much ordinance as I could for as long as I could, rather than going for the tempting sneak hit at the start and getting caught up in a deadly melee near the moon! Next time!

Friday 27 December 2013

BFG 1500: Craftworld Eldar (Kraytonian) vs Tyranid

Game two, I got out my Dark Realm miniatures Kraytonians, versus Jesse's old school Games Workshop Space Fleet era Tyranids. With all the big vanes/sales on the Kraytonians I use them as Craftworld Eldar in BFG.  I sold Jesse the Tyranids about a year ago and he and another local painter did great job painting them. Once again we used the BRG revised rules.

My Craftworld list was:
  • 1 Void Dragon with Commander and reroll
  • 2 Wraithships with Pulsars and Keel Torpedoes
  • 2 Wraithships with Weapon Batteries and Keel Torpedoes
  • 3 Shadowhunters with Phantom Lances
  • 3 Shadowhunters with Phantom Lances

Jesse's Tyranid list was:
  • 3 Scylla Hive Ships each with Synapse Node and 2 extra damage points.
  • Lots of Drones (nasty little bug ships) and Kraken (nasty bigger bug ships) of various types.
Jesse's full sized Hive Ships are still being painted, so he took just three of the baby ones in this game. They are still tough but have lower leadership for the vital command checks.


Here's the start of the game, my table edge is the sunward edge so I have the solar wind in my favour (Eldar move using the solar wind like sailing ships using the wind in other naval games). The Tyranids move first and advance on all ahead full in a big swarm. A few of them end up close enough to fire on my Pulsar armed Wraithships on the left. They open fire, damaging one of the Wraithships, wrecking its mast (so it can't turn until repaired!), and  starting a fire. In the end phase I manage to put out the fire. 

In my turn I move aiming to get around the flank and rear of the swarm.

My Wraithship squadron with the damaged mast  (far left in below photo) flies all ahead full to get out of the way of the Tyranid fleet.  My Void Dragon also steers clear, and launches its 4 bombers.  

The other Wraithship squadron and Shadowhunters attack the flanks of the swarm.

I destroy some bug ships on the right flank of the swarm, while my Shadowhunters on the left fire ineffectively at the Hive ships (the 3 triangular shaped ships to the rear). My bombers advance to intercept any ships that turn towards my ships in the bug turn.

 The Tyranids manage to turn some of their fleet, while others blunder around instinctively.

Tyranid fire kills a Shadowhunter on the left, and cripples a Wraithship on the right.

Next turn, my Eldar sweep around behind the Tyranids, and concentrate all fire on the Scylla Hiveships, killing one of them and slightly damaging another. My bombers make their attack runs but only kill a drone. I use no special orders this turn, to increase the chances of the Tyranids failing their command tests.

Tyranid turn, and they fail almost all of their command checks and so are unable to turn and fire quickly enough to catch the eldar. They remain stuck in a big clump with the vital Hive Ships exposed  and separated from the rest of the fleet out on the left. Jesse concedes,  as next turn my entire fleet will be moving and firing unimpeded at these two remaining Hive Ships - the loss of which will leave the rest of the Tyranids milling around in confusion. Quick game! No doubt Jesse will have some new tricks (and bigger hive ships) for next time though...

BFG 1500: Orks vs Marines

Two games of BFG today, here's the first one versus Jonathan. I took my Orks using the new BFG revised lists which should be up on Afterimagedan's BFG Blog soon.

My Ork list was:
  • Deathdeala with extra powerfield, Warlord, and reroll
  • 2 Terror Ships
  • 2 Kill Kroozers
  • 5 Ravagers
  • 5 Brutes
  • 5 Brutes

Jon's Marine list (using the Ground Zero Games Neu Swabian League range) was:
  • Battle Barge with Leader
  • 2 Strike Cruisers
  • 4 Hunters
  • 4 Hunters
  • 4 Novas
  • 4 Gladius

We played a fleet engagement, with my orks coming in from both short ends of the table and Jon in the middle. I was faced with the classic dilemma of "do I divide my forces?". If I do, I can catch the marines in a pincher movement, but on the other hand it risks the prospect of him concentrating all his forces against part of mine... 

I decide to split my Ork forces, with Deathdeala, Terror Ships and Brutes on the the left flank in photo below, and  Kill Kroozers, Brutes and Ravagers on the right flank.

I win the roll for first turn, and decide to rush the Marines and unload everything I can. 11 assault boats manage to wreck all the armaments on a strike cruiser AND the Battle Barge. In addition torpedoes and guns do a point of damage to both of the Strike Cruisers. Seems like a good start!

It gets even better as the Kill Kroozers unleash their volley of torpedoes on the other flank...

Boom! A squadron of Marine Escorts is eliminated.

Now it's the Marines turn and they swing all their remaining ships towards Deathdeala and my Terror Ships.

Feeling rather brave given the damaged systems on the Marine capital ships (and hoping to ram next turn) I don't bother to brace for impact with Deathdeala. This turns out to be a bad idea as Deathdeala takes 10 points of damage - only 2 left!

Undaunted, Deathdeala puts all power to thrusters and rams the BattleBarge! But it's just a glancing impact and both ships survive taking only a single point of damage each.  My Terror Ships do better, reloading ordnance and firing like mad they take down another 4 Escorts and damage some systems on the intact Striker Cruiser with more Assault Boats.

My other ships are racing to get to the action, but they are still a turn or two away... I notice that the entire Marine fleet is managing to concentrate on 3 of my ships (that are also my carriers). "Never divide your forces in the face of the enemy" said many commanders I should have listened to...

Next turn the Marine Capital Ships steer clear of the combat, concentrating on repairing all their damaged systems. The Marine Escorts swing in behind my Terror Ships shooting up the weak rear armour and crippling one of them despite a successful brace for impact order.

My turn and things are a little heart stopping... as my poor positioning has Deathdeala (on 1 hit point!) and my Kill Kroozas heading straight for Asteroid fields. The Orks ignore orders to slow down and plow straight through the asteroids. Miraculously they avoid taking damage.

My Brute Ram ships close on the Battle Barge firing ineffectively, while my Terror Ships try to get away from the Marine Escorts - or at least lure them towards the Kill Kroozers.

Another turn, the Marine Escorts finish off my damaged Terror Ship and  damage the other one too. I retaliate with the Kill Kroozers and destroy a couple of the Marine Escorts in return. I continue to fire ineffectively at the Battle Barge with my other ships.

I wreck more Marine Escorts... but the Battlebarge finally finishes off Deathdeala and then starts picking off my Escorts.

The Marine Escorts close in and finish off the remaining Terror Ship...

Which explodes also destroying the three Escorts! One last "victory" for the orks...

Because the rest of my ships keep failing their leadership tests, and are dying without hope of even taking down the Marine shields by now. The Marine Capital ships have almost completely repaired all the systems that my Orks had conscientiously wrecked, and are now picking off Ork Escorts at leisure.  My two Kill Kroozers beat a hasty retreat, not having the speed or firepower to take on the three Marine Capital ships. Victory to the Marines and well done to Jon!

Tuesday 24 December 2013

BFG 1000: Imperial vs Chaos

I had time for a quick game of Battlefleet Gothic with my mate Mike today. I borrowed his Imperials and he used his Chaos.

My list was:
  • Mars Pattern Grand Cruiser
  • 2 Lunar Class Cruisers
  • 3 Firestorm Escorts
  • 4 Cobra Escorts


Mike used:
  • 1 Despoiler Battleship
  • 2 Acheron Cruisers
  • 3 Iconoclast Escorts


Mike begins and turns his capital ships side on to begin the long range broadside fire, while his Escorts and Fighters provide cover in front.

Escort screens pass through each other. We lose an escort each, and I take damage on my Cruisers from the long range fire and some Bombers that get through my defences. My first torpedo salvo is dealt with by enemy fighters.

I keep taking heavy damage and a Lunar is crippled. I deliver another torpedo salvo almost crippling an Acheron, but most of my torpedoes miss or blow up trying to fly through the debris. Mike makes his leadership rolls and is successfully ignoring my Escorts to focus on my Cruisers with all his long range Lance batteries.

My first Lunar fails to brace for impact and explodes under heavy Lance Battery fire...

Boom! Warp Engine Implosion! Catastrophic damage with 9cm range explosion, cripples the other Lunar, and damages the Grand Cruiser badly too.

One more turn and my other Lunar is destroyed, and my Grand Cruiser is crippled with engines damaged. One of the Acheron Cruisers is also crippled, but I only have a few Escorts left (including Cobras with  leadership 6 trying and failing to reload torpedoes), against an untouched Battleship and friends. I concede, well done Mike! Also reminds me I should get my own Chaos and Imperials painted up!

Sunday 22 December 2013

Epic 5K: Death Guard vs Eldar Titan Legion

It's been some months since I've played a game of Epic Armageddon, so I decided to give Nurgle's Death Guard a spin (or slimy shuffle), against Tim's Fir Iolarion Eldar Titan Legion. I used the excellent Army Forge website to make my list - you can check out the NetEA section here to see the Death Guard and Fir Iolarion army lists. For those not in the know, NetEA = Net Epic Armageddon player developed rules and lists as discussed on the Tactical Command forums.

My Death Guard force can be seen in the photo below, and consisted of:
  • 3 Plague Marines, 3 Chaos Marines, Daemon Prince and Pact
  • 3 Plague Marines, 3 Chaos Marines, Lord, 3 Rhinos and Pact
  • 3 Plague Marines, 3 Chaos Marines and Lord 
  • 3 Plague Marines, 3 Chaos Marines and Lord
  • 4 Contagion Engines
  • 4 Contagion Engines
  • 1 Plague Tower
  • 1 Plague Tower
  • 1 Plague Zombie Infestation (3+2D6 Zombies)
  • 4 Terminators with Lord, Icon, Pact and Chaos Champion
  • 4 Terminators with Lord, Icon, Pact and Chaos Champion 
  • 3 Helltalons
  • 3 Helltalons
  • 1 Repugnant Titan
  • Daemon Pool of 1 Great Unclean One, and 6 Plaguebearers
I didn't have plague marines painted up, so I used just normal green marines as Chaos marines, and the Chaos marines as the Plague marines (yes I know it should probably have been the other way around). I had just painted up all the Nurgle Daemon engines and Plague Zombies so was pretty keen to use them in this battle!


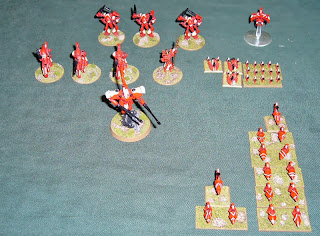
Tim's Eldar are in the photo below, and consisted of:
  • Warlock Titan with D-Cannon and Power Fist
  • Phantom Titan with 2 Pulsars and Gate
  • 2 Revenant Titans
  • 2 Revenant Titans
  • 3 Bright Stallions (Eldar Knights)
  • 3 Towering Destroyers (Eldar Knights)
  • 5 Jetbikes, 1 Vyper
  • 5 Jetbikes, 1 Vyper
  • 6 Wraithlords
  • 5 Guardians, 5 Weapon Platforms
  • Vampire Hunter
  • 3 Nightwings
  • Gate of Vaul
  • Avatar

Turn 1

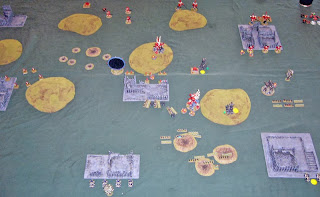
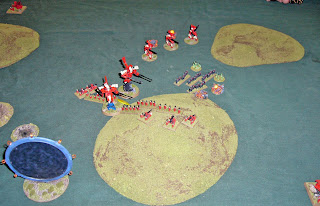
The photo below shows Turn 1 deployments, my Contagion Engines behind cover, and Plague Towers driving forward hugging some cover. One shoots and kills a jetbike in the distance. 

The Eldar airforce swoops down and my Helltalon Interceptors intercept. One Helltalon and one Nightwing are destroyed, the Eldar Vampire Hunter Bomber takes a point of damage but gets its payload off and destroys two Contagion Engines. 

The Warlock doubles out of the Gate of Vaul, and blasts a Plague Tower, hurting but not killing it.

End of Turn 1, bothy sides have committed themselves in the centre. Both Plague Towers are heavily damaged and broken, but are about to rally. 

Turn 2

Terminators teleport beside the most advanced Plague Tower in the centre of the field, and behind the Towering Destroyer Eldar Knights in the ruins on the right. A circle of 9 Plague Zombies arrives and surrounds the Warlock Titan in the centre, and the Eldar Avatar teleports nearby also.

Eldar win the initiative. The Phantom moves into the ruins out of charge range of the Terminators, and fires and destroys the first Plague Tower. The Warlock sustains fire and practically destroys a retinue in front of it. The Avatar then charges into combat engaging the Plague Zombies and another retinue, destroying the Plague Zombies and almost destroying the retinue too due to the aid of support fire from the Eldar Titans.

Terminators summon the Great Unclean One and 4 Plague Bearers, and charge the Eldar Revenant Titans and Jetbikes. The Jetbikes are destroyed, the Revenants suffer 1 damage and flee, and I lose one Plague Bearer. 

The other revenants fire ineffectively at the other Terminator formation and I charge the Towering Destroyers, wiping them out for the loss of two marines. Bit of a mistake here as I intended to use the marines as fire support for the Titan which did the engage action - but I had got too close and the Towering Destroyers engaged my infantry. Oh well it worked anyway!

Some other minor activations happen, and then my other Terminators take a kicking in a firefight against the Eldar Guardians and Bright Stallions (the Revenants in the picture are those that had already fled from the Great Unclean one so are broken and don't help their buddies out).

End of Turn 2, Chaos is looking a thin on the ground, having lost both Plague Towers and two retinues, but I've also wiped out 3 Eldar formations this turn.

Turn 3

Things get brutal as all the Eldar macro and Titan Killer Weapons open up, killing my Titan and finishing off another retinue. I'm still in the game but only just. I charge my Great Unclean One and Terminators towards the Bright Stallions and Eldar Blitz objective. My remaining Contagion Engines finish off a Revenant and break the formation.

Turn 4

My Terminators and Daemons engage and destroy the Bright Stallions, and my Contagion Engines break the Eldar Guardians. Too late though as the Eldar Titans blast away all my formations on their side of the table with Pulsars and a D-cannon. 

Eldar win 3-0 with Defend the Flag, They Shall Not Pass and Break Their Spirit objectives. Eldar most valued players, Phantom and Warlock!  My expensive armoured units really suffered at the hands of the Eldar who had 6 Titans and 3 Knights with armour wrecking guns. Of course I also made quite a few mistakes, including a list that could have been better. Anyway fun times and well done to Tim (again!). 

Here's the Eldar I managed to knock out of the fight, all the knights and a few other bits and pieces.

And my own casualites - considerably more!