Thursday 3 November 2016

Epic 4K: Thousand Sons vs Imperial Fist

A rematch of Thousand Sons and Imperial Fist forces, with changed army compositions. 

I took some Firelords and a Warp Palace, plus a couple of Deceivers in my armour formations. Andrew took Tactical Marines and Devastators instead of mass Scouts.


Incompertus, 4000 POINTS
Thousand Sons (6.1.1)
==================================================

RUBRIC FELLOWSHIP [275]
Sorcerer, 6 Thousand Sons Marines units.


RUBRIC FELLOWSHIP [275] 
Sorcerer, 6 Thousand Sons Marines units.

RUBRIC FELLOWSHIP [375]
Sorcerer, 6 Thousand Sons Marines units., Daemonic Pact, Icon Bearer, Champion of Tzeentch

THOUSAND SONS DAEMON POOL [125]
Greater daemon (Lord of Change), 5 Lesser Daemons (Horror, Screamer, Flamer and Daemonic Beast units)

AHRIMAN'S CHOSEN [450]
Sorcerer, 9 Thousand Sons Marines units. All have the Teleport ability

SCARAB OCCULT [550] 
5 Thousand Sons Adeptus, Daemonic Pact, Icon Bearer, Champion of Tzeentch, Daemon Prince of Tzeentch

SILVER TOWER COMPANY [325]
4 Silver Tower

THOUSAND SONS ARMOR [300]
3 Predator, Deceiver, Land Raider

THOUSAND SONS ARMOR [300]
3 Predator, Deceiver, Land Raider

FIRELORD BOMBERS [250]
2 Firelord Bombers
DOOMWING FIGHTERS [150] 
3 Doomwing Fighters

WARP PALACE OF TZEENTCH [625] 
Daemonic Pact, Champion of Tzeentch


Imperial Fists, 4000 points

Command Group
6 Tactical Marines, Supreme Commander, 3 Rhinos [375]
4 Devastators, 2 Rapiers, 4 Rhinos [300]
Attached Fire Support, 4 Whirlwinds [300]
Bastion, Techmarine, 2 Thudd Guns [275]

Forward Defensive Group
6 Tactical Marines, 2 Bunkers, 50 cm Trenches [275]
Bastion, Techmarine [225]

Defensive Flank Position
6 Tactical Marines, 2 Bunkers, 50 cm Trenches [275]
Thunderfire Battery, 4 Thunderfire Cannons [250]
Bastion, Techmarine, 2 Thudd Guns [275]
Attached Recon, 5 Landspeeders [200]

Mobile Flank Group
4 Devastators, Librarian, 2 Rapiers, 4 Rhinos [350]
4 Devastators, 2 Rapiers, 4 Rhinos [300]
Attached Recon, 5 Landspeeders [200]

Air Support Group
2 Storm Talons [200]


2 Storm Talons [200]


Turn 1


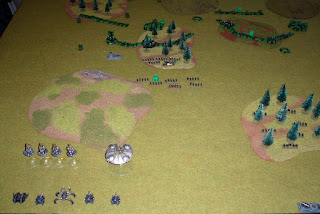
I win Strategy Roll and deploy on one long side. Here's the setup, scenery was a range of brush, forests and hills. Imperials have heavy entrenchments on their right flank, and I match this with my own deployment.

A better view of Imperial deployment I'm facing.

My left.

My right. Few forces from either side here.


I teleport in the Chosen and win Strategy Roll. They engage but loose the combat with a Devastator Formation on the extreme right of the Marine line. Damn. I lose a casualty, Marines lose none.

I retain and my right flank Armour formation advances and fires, killing all but one Landspeeder which is a much better performance.


Marines then start firing on my Retinues, killing a unit and placing blastmarkers.  However my Retinue with support of another Retinue engages and wipes out a Marine formation in the trench ahead of them, despite the blastmarkers, in a two round engagement.

My formation takes the trench but is broken by further fire.

My Firelords attack, one being shot down by AA from a Bastion, and the other causing no casualties despite the advantage of incendiary 'ignore cover' bombs and guns. The other Firelord is destroyed by fighters.  

Another Retinue is broken. My Warp Palace doubles forward placing some blastmarkers on a Bastion. 

Silver Towers wipe out another Land Speeder formation.

Marines concentrate all fire on my Chosen, making use of crossfire, and only one is remaining at end of the turn.

End of turn.


Turn 2

My Occult arrives in the middle of trouble hoping to summon daemons, but I lose the Strategy Roll. With placement I hoped that forest will help screen out some of the damage that could happen here.

The Marines concentrate in force...

And my Occult is driven back broken but with suprisingly few losses for the amount thrown at it. My Retinue nearby summons Daemons and engages and destroys the Bastion ahead of it.

However the Lord of Change takes a point of damage and critical hit and dies. My Warp Palace fails to do much damage.

On the right my Armour formation moves and brings the bastion there under fire.

Silver Towers are broken by fire.


End of turn and situation for the Thousand Sons isn't great.


Turn 3

Marines win Strategy Roll again, and break my left Armour formation, and cause more casualties.


My Warp Palace obliterates most of a marine formation, but I have very little left. The marines focus fire on breaking the Warp Palace with blastmarkers.


Marines secure their objectives, winning 3-0 with Defend the Flag, They Shall Not Pass, and Take and Hold.

Conclusions

So I failed to break through the Marine defences this time, instead being defeated handily. Firelords were a disappointment as usual, and Warp Palace was unable to generate enough damage for the points. The Armour formations worked surprisingly well even with the slower Deceivers I thought. Andrew's choice of Tactical and Devastator formations also seemed to work better for him. Next time!

Monday 17 October 2016

DBX Ancient Macedonian Army

Here's what I have been working away on over the past couple of months. A 28mm Ancient Macedonian army for DBMM and Big Battle DBA

All infantry are plastic Victrix figures from their Ancient Macedonian and Ancient Greek range. All mounted including elephants are metal Aventine Miniatures from their Pyrrhic range, with the exception of the horse archers which are Warlord. I originally had some other Warlord figures, but found them disappointing in terms of sculpting and size and so replaced them with more Victrix and Aventine. Both Victrix and Aventine are great figures, lovely to put together and paint. Transfers are Little Big Men Studios range, from Victrix. Lances and spears on the metal figures are wire pikes cut to size, from Aventine/Warlord. 


The Phalanx. Suitably imposing! Make sure you glue your pike arms reasonably straight up and down when assembling these new Victrix figures so they rank up nicely!

All shields in the army are done with Little Big Men Studios 'transfers'. If you get these make sure you read the instructions carefully! Paint the shields white (not bronze as I did first time around!) You have to cut the pattern out, then you pick off a plastic backing and stick them on the shield (they have a sticky side). You then wet the paper back and press the transfer into place, and slide off the paper back. Not as bad as it sounds once you've done a few and probably easier than the old water slide transfers. Still a few bad words were said as I did the first of them, knowing I had over a hundred to do!

Lancer heavy cavalry - Companions/Agema.


More Lancers.


Light Troops. Horse Archers in Front. Slingers and Javelinmen behind.

And of course, some elephants.


And some quickly done baggage. Tents and campfire from Renedra.

Rear view of army.

I've even got the measuring sticks ready, which I've had ever since DBMM 1.0 was released. We are up to DBMM 2.1 now, and DBMM seems to be getting more popular here in New Zealand. Big Battle DBA is a simpler version.

That's all the army that is painted up so far. I still have boxes of Victrix Greek Mercenary Hoplites, Peltasts and Hypaspists, and a few more Aventine cavalry to add. But this painted force is already plenty to start playing some games, starting with a Big Battle DBA tournament that's just got underway this week. Good times.

Thursday 6 October 2016

Epic 4K: Thousand Sons vs Imperial Fists

Another Epic game. The Thousand Sons Army Champion requested that I do a game using Daemons and Chosen formations, so that sounded like a challenge worth accepting!

Here's the list I used:

Incompertus, 4000 POINTS 
Thousand Sons (6.1.1)  (Actually now 6.2).
================================================== 

RUBRIC FELLOWSHIP [370] 
Sorcerer, 6 Thousand Sons Marines units., 2 Rhino, Land Raider

RUBRIC FELLOWSHIP [275] 
Sorcerer, 6 Thousand Sons Marines units.

RUBRIC FELLOWSHIP [375] 
Sorcerer, 6 Thousand Sons Marines units., Daemonic Pact, Icon Bearer, Champion of Tzeentch

SCARAB OCCULT [550] 
5 Thousand Sons Adeptus, Daemon Prince of Tzeentch, Daemonic Pact, Champion of Tzeentch, Icon Bearer

AHRIMAN'S CHOSEN [450] 
Sorcerer, 9 Thousand Sons Marines units. All have the Teleport ability

SILVER TOWER COMPANY [325] 

4 Silver Tower

THOUSAND SONS ARMOR [200] 
4 Predator

SEKHMET DISC RIDERS [350] 
Sorcerer, 9 Disc Riders, Daemonic Pact

SEKHMET DISC RIDERS [325] 
Sorcerer, 9 Disc Riders

SEKHMET DISC RIDERS [325] 
Sorcerer, 9 Disc Riders

DOOMWING FIGHTERS [150] 
3 Doomwing Fighters

DOOMWING FIGHTERS [150] 
3 Doomwing Fighters


THOUSAND SONS DAEMON POOL [155] 
Greater daemon (Lord of Change), 7 Lesser Daemons (Horror, Screamer, Flamer and Daemonic Beast units)


Andrew use his "Ogre" army counting as Imperial Fists.

Pan-European Infantry Battalion (GEV-PC)

First Company (Battalion Command)
HQ Platoon, 4 Scouts, 2 Rhinos, Supreme Commander [250]
2nd Platoon, 4 Scouts, 2 Rhinos [150]
3rd Platoon, 4 Scouts, 2 Rhinos [150]

Second Company
HQ Platoon, 4 Scouts, 2 Rhinos, Captain [200]
2nd Platoon, 4 Scouts, 2 Rhinos [150]
3rd Platoon, 4 Scouts, 2 Bunkers, 50 cm Trenches [150]

Third Company
HQ Platoon, 4 Scouts, 2 Rhinos, Captain [200]
2nd Platoon, 4 Scouts, 2 Rhinos [150]
3rd Platoon, 4 Scouts, 2 Bunkers, 50 cm Trenches [150]

Support Group
Missile Tank Battery, 6 Whirlwinds [425]
Fire Base Alpha, Bastion, Techmarine, 4 Thudd Guns [325]
Fire Base Beta, Bastion, Techmarine, 4 Thudd Guns [325]
Fire Base Gamma, Bastion, Techmarine, 4 Rapiers [325]

Attached Ogre, Mark V
Reaver Titan [650]

Air Support
2 Storm Talons [200]


The Battle

Here's the battlefield setup. Both Strategy Rating 5 and Andrew won setup roll and chose corner deployment, favouring the top left in photo below. Imperial fortifications extend in depth in this area. Imperial Take and Hold objectives are in centre of table, and Chaos Take and Hold objectives are both in bottom left.

My deployment.

Imperial deployment.


I had used the old Epic40K Battlebook to generate terrain, and one of items was this electromagnetic storm which moved 2d6x5cm in a random direction each turn. Any formation passed over takes D3-1 blastmarkers. As it turned out it had no effect on the battle however!

Turn 1 and I teleport in my Chosen and Occult, but then I lose the strategy roll. I wanted to do an early assault to break the Titan, but with both of us being Strategy 5 this is a somewhat risky proposition. The Reaver is geared for an anti-tank rather than anti-infantry role though, so that at least was in my favour.

The Ogre (Reaver Titan) sustain fires into the Occult formation killing two of them. Two Scout formations then do a combined engage action on the Chosen with support of the Reaver and break them, though only killing one of them for loss of two Scouts.

My activation and the Occult summons all the Flamers, engaging and breaking the Reaver Titan, and do a point of damage to it, and also killing 3 Scouts in the combined engage action. 4 Flamers are lost.


Next I move one of my garrisoned Retinues to cover and close to the forward most bastion.

The rest of my forces advance, with air attacks doing some damage. We lose a plane each from each of our air formations this turn.


My Lord of Change is summoned by my third Retinue, and assaults and breaks a Scout formation in two rounds of combat.

Having advanced in the second round of combat, they consolidate forward into the ruins.

My Disk Riders sweep in annihilating Scout formations (this is now turn 2).


I decide to try and take the first bastion.

It is destroyed by my first Retinue with support from the third Retinue and the Lord of Change.

Overview, Daemon Prince has retreated to bottom left but has rallied. Scout formations continue to take heavy damage, my third Retinue is broken by Bastion and Artillery fire, and the Lord of Change is killed.

My Disk Riders take out Scouts but start to come under counter fire.

Looking from my left flank.

My Chosen still in the open but reinforced armour and fearless is serving them well and they have rallied.

Centre of the line.

The right, with only a single scout holding out here now.

Overview, end of turn 3.

Start of Turn 4. Only a few decimated scout formations are left, I've suffered quite a few casualties among the Disk Riders, but my Chosen and 1st Retinue are still in good shape, as are my Towers, and two Predators are still active. I have 4 Doomwings, and 2 Stormtalons are still alive. Two bastions and the Imperial artillery are still active.


I win Strategy roll finally. Chosen double over and 1st Retinue engages the Reaver with their support. The Reaver is broken again.

It drives down the road. More fire is exchanged.

End of turn 4, and still victory conditions are 0-0! We roll and go for a 5th turn.

I try and wipe out whatever I can get to, and stay out of artillery range. The Silver Towers drop the Reaver to half strength. Imperials also have 2 Bastions, their artillery, and 1 scout and 1 rhino left. I am somewhat better off. Thousand Sons win on victory points, 2325 to 1342.5!


Conclusion

A very hard fought game, with both sides wearing each other down, but the Scout heavy Imperial's unable to survive this battle of attrition as well as the Thousand Sons marines with their reinforced armour and fearless abilities. Post-game analysis Andrew guessed his deployment of Take and Holds might not have been the best, as they were easily reachable by me, and he was forced to effectively sacrifice Scout units to prevent me winning on Victory Conditions. I kept my less well armoured formations back and let the Retinues and Chosen take the bulk of fire, and ignored most of the Bastions and Artillery.  

My first teleport assault was pretty risky, but didn't work out too badly in the end. Andrew might have done well to break my Occult formation perhaps, which ended up summoning 7 Flamers when it was just one blast marker off breaking. But tough choices as then the Chosen would have attacked and perhaps also smashed something.

Daemons, I'm not sure on. They definitely have some advantages, but sacrificing points and activations to use them in an army with already high costed formations isn't something I can see happening a lot of the time! Of course they worked well enough here, but an alternative might have done just as well. Doomwings flame cannons also turned out to be pretty useful with their Ignore Cover ability against the Scouts! Lack of effective ground AA is still a problem for Thousand Sons though.