Mike and I had our annual end of year BFG game again. I took my Pax Arcadians counting as Tau, and Mike took an Imperial fleet.
My Pax/Tau fleet consisted of the following. My last game with these didn't go so well - my Explorer Class Carriers got broadsided at close range by Chaos Murder and Slaughter Class Cruisers and it was over quickly. I aimed to keep my Carriers further away this time, and also took my capital ships individually rather than as squadrons to give greater tactical flexibility.
- Explorer Carrier with Tau Kor'O Commander
- Explorer Carrier
- Hero Cruiser
- Hero Cruiser
- Hero Cruiser
- 5 x Defender Escorts
- 3x Orca Escorts
- 3x Orca Escorts
Mike's Imperial Fleet composition was technically illegal in that he had two Battleship class ships, but I didn't mind. He was also using a Star Destroyer model from the 'Armada' game as his Emperor Class Battleship as he had just seen Force Awakens... and well you know...!
- Emperor Class Battleship
- Retribution Class Battleship
- Lunar Cruiser
- Lunar Cruiser
- Lunar Cruiser
- 4 Sword Escorts
Here's the setup. Cruiser clash with two solar flare phenomenon on the table that ended up doing nothing all game in the end. There was an asteroid field to my right, and gas clouds in the centre on the Imperial side.

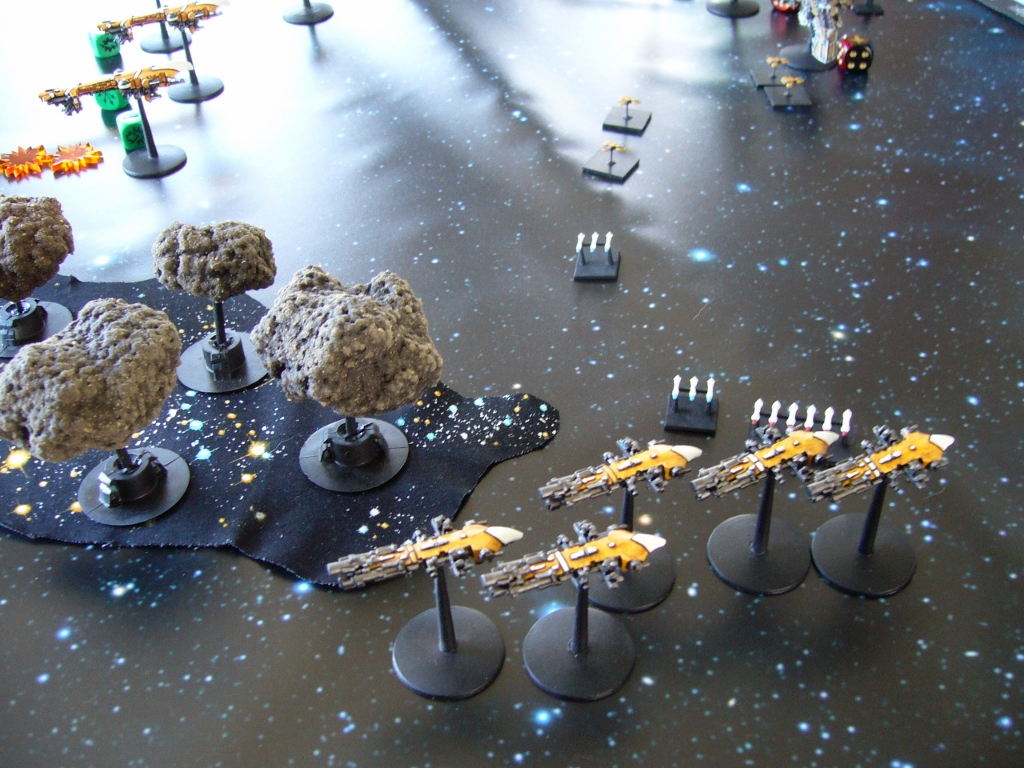
I was happy with my new star terrain map. Here are my Hero Class Cruisers and Defender Class Escorts.

And as I said Mike was using a Victory Class Star Destroyer from 'Armada' as his Emperor Class Battleship! Actually both this ship and the fighters were of a scale that doesn't look too out of place in BFG. It did remind me of an issue I have with the Star Wars fleet games though, all the clutter on the bases and tokens detracts from the visual look for me.

Imperials move first and advance, the Emperor sending out fighters (Tie Fighters of course!) and Tau launching Mantas, in waves of 4 from the Explorers and waves of 2 from the Heros.

I advance, shooting down three of the Sword Escorts. My Heros are on lock on orders, and one Explorer makes a All Ahead Full order.

My Orcas head left, and my Defenders right.

Imperials destroy an Orca, and damage one of my Heros and their fleet tacks to port. Tie Fighters take out one of my Mantas.

The Sword Frigate gets a critical hit and cripples my first Hero Cruiser!


My turn and we fire back doing a few more points of damage to the Lunars.


My Bombers move in and destroy the first Lunar Cruiser, and damage the others.

The Lunars manage to get off some Torpedoes at my Defenders though.

My Heros close in on the Imperial Cruisers but the Retribution Battleship moves to interdict.

I brace for impact but take some damage.

The Defenders get lucky and only take a single point of damage from the Torpedo salvos.

My Explorers reload and launch more waves of bombers.

And my Defenders fire back with their prow batteries damaging the nearest Lunar.


My Explorers send fresh waves of reloaded Mantas through the Asteroid Field, while remaining protected from enemy fire in this position.


One my Hero Cruisers is destroyed, and my Bombers continue to damage the Lunars.

Bombers from the Destroyer (X-wings here as Mike still had his Tie-Bombers in the packaging!), heavily damage one of my Heros. It takes 3 damage and so has the other remaing Hero at this stage.

My bombers destroy another Lunar.

I decide to start disengaging, my two remaining Heros manage to successfully jump away before they are crippled.

My Defenders fail to finish off the last Lunar.They also launch a tracking missile volley to hunt down either the Lunar or Sword as required next turn.

The Retribution fires a torpedo salvo through the Asteroid Field (which should have automatically detonated them - it's gas clouds not asteroid fields that torpedoes can pass through - oops!). My Explorer Flag Ship takes 3 damage, and then both my Carriers disengage.

My Defenders wait for their missiles to do some damage but 3 of the 5 run out of fuel immediately, one is shot down and the last one fails to damage the Sword - damn. The damaged Lunar Cruiser also disengages with 1 hit point left. Faced with two unharmed Battleships and incoming bombers my Defenders also disengage.

End of game. I've done more damage to the Imperial Fleet but couldn't quite finish off another cruiser and frigate to tip the balance in my favour. Tau score 440 points, but Imperials get 574 points - 270 of that for holding the field at the end of the game and recovering hulks.
Conclusion
Another defeat for me, but I felt I worked out what to do with the Tau a bit better this time. If I had only finished off that last damn Sword Frigate (that also managed two criticals against my Cruisers!), and destroyed the last Lunar before it disengaged (it had a single hit point remaining) I would have won. But at least most of the Tau fleet escaped intact this time! As Mike said this battle was a bit like Jutland, where the Germans did more damage to the English but retreated and lost the overall situation.
Reminded me too that I must play this game more as it is a lot of fun, and the star field from Deep Cut Studios really looks good. I need to work out how to photograph things better though against the dark background. Might have to play around with camera settings. Any tips gratefully received!
In addition to a large painted GW Ork Fleet, painted Dark Realm Pax Arcadians and Kraytonians - I still have completely unassembled Imperial, Chaos and Eldar fleets in boxes, that I bought just before GW discontinued the game! And a Dark Realm Andrayada Fleet still unpainted too! Interestingly I see GW is talking about resurrecting BFG and other specialist games sometime soon - we'll see!
No comments:
Post a Comment