Here's the second game I played against Glyn. The first game ended when Glyn's experimental air assault army came to grief rather abruptly, but in this second game he used a "ground pounder" Marine list that he is more familiar with.
I was using the Tyranid list that is still in development, and trying to "break it". By break it I mean picking what seem like potentially overpowered combinations to see whether these unbalance the game, so they can be removed before the list is approved for Tournament use! For this one I took maximum Tyranid war-engines (1000 points worth) and also went heavy on the Tyranid artillery. I was wondering if Dactylis might be overpowered as part of Synapse Swarms, so I spent almost half my army points on these formations. My army included a total of 12 bug heavy artillery (the Dactylis), with an additional 10 bug light artillery (Biovores).
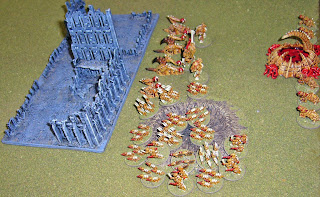
Here's a gratuitious shot of the Dactylis leading the way up a hill and through ruins during the game. If I remember correctly Jervis Johnson (designer of Epic), once said the Dactylis was one of his least favourite Epic models. I forget his exact words but they were something like "What were we thinking? It looks like a dead plucked chicken lying on its back throwing eggs!". My opponents have taken to calling mine the "Tomato Throwers", given the red colour I painted the spores.
Here's my full Tyranid List:
Hive Fleet Onachus Tyranids (NetEA v10.2 *UNDER DEVELOPMENT*)
==================================================
TYRANID SWARM (S) [490]
4 Termagants, 4 Dactylis, 2 Zoanthrope (745.M41), Hive Tyrant, 2 Hormagants
TYRANID SWARM (S) [465]
4 Termagants, 4 Dactylis, Zoanthrope (745.M41), Hive Tyrant, 2 Hormagants
TYRANID SWARM (S) [465]
4 Termagants, 4 Dactylis, Zoanthrope (745.M41), Hive Tyrant, 2 Hormagants
TYRANID SWARM (S) [275]
4 Termagants, 4 Tyranid Warriors, Gargoyles, 2 Hormagants
NEXUS SWARM [350]
Dominatrix
HARRIDAN SWARM (S) [150]
1 Harridan
HARRIDAN SWARM (S) [150]
1 Harridan
HIERODULE BIO-TITAN (745.M41) [350] (Armed with Razorclaw)
BIOVORE SWARM (S) [150]
5 Biovore
BIOVORE SWARM (S) [150]
5 Biovore
Glyn's Marine army was a "ground pounder" list - i.e. no air support or teleporting Terminators. I believe it was the following:
6 Tactical, 1 Landraider, 1 Hunter, 2 Rhino
6 Tactical, 1 Landraider, 2 Rhino
4 Devastator, 1 Landraider, 1 Rhino
4 Scouts, 2 Rhino
4 Scouts, 2 Rhino
4 Landraiders, 1 Hunter
4 Predator Annihilators
4 Predator Destructors
4 Vindicators
5 Landspeeders
1 Warhound Scout Titan
Turn 1
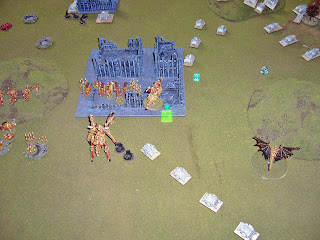
Here is the setup. My Tyranids are concentrated towards the left flank, while Glyn is spread out to avoid artillery barrages, and back in his deployment zone rather than garrisoning for the same reason.
Here's my "Break the Spirit" swarm near my Blitz objective, with 4 Dactylis and friends, backed up by an intermingled gaunt swarm on their left and Biovores behind them either side of the Blitz objective.
Glyn wins Strategy Roll (Marines Strategy is 5 and mine is 1 so they can be expected to win it pretty much every turn!), and makes me go first. Over the course of the turn my two rightmost Dactylis swarms advance, both to gain cover and to threaten the entire table with artillery fire (they have 90cm range with indirect fire). Once they have moved Glyn advances rapidly to threaten the Tyranid positions. Landspeeders in the centre are countered with Biovore and Harridan fire, and a few other Marine formations also suffer some losses.
A Marine Scout formation rushes up to within 10cm of my Dactylis swarm in the central ruins. By doing so they bring the swarm within their harassment range ("Scout" ability gives a unit a 10cm zone of control rather than 5cm). This means my swarm will have to either assault them or move out of this 10cm zone of control in their next turn, thus having their long range fire disrupted. Not liking this I rush up my Dominatrix to shoot at the Scouts and then the Hierodule engages them in a firefight, wiping them out.
The Marine tanks break the now exposed Hierodule with weight of fire, also doing a point of damage to it, and it scuttles back behind the ruins. End of turn the Hierodule rallies and regenerates the point of damage.
Turn 2
The Marines win the Strategy Roll and launch a daring attack with their tanks charging through the bug lines! First the Predator Destructors race through and shoot my biovores killing two and breaking the formation. Then the Predator Annihilators are able to crossfire my Dominatrix given the position of them Predator Destructors. They do 2 points of damage to the Dominatrix breaking it also, and both the Dominatrix and the Biovores retreat towards my Blitz objective.
My turn and I sustain fire with the first Dactylis swarm in the central ruins, killing some Devastators and a Rhino on the left flank and also putting a blast marker on the nearby Tactical formation.
I retain and my Dactylis swarm on the central hill targets the Tactical formation on the right flank killing another two stands. I want to make sure the Marine infantry has the stuffing knocked out of them before they can assault my artillery formations, and my artillery fire is less effective against the Marine tank targets given there would be fewer targets under the barrage templates.
The Marines advance their Landraider formation firing and and killing my right Flank Harridan. The Vindicators then advance and wound and break my Hierodule. It's fearless so it refuses to move, instead stumbling around confused. I retaliate with more Artillery fire, but it has little effect.
The Marines make an attempt to capture the central ruins. Tactical Marines (lower right) double and fire at the Dactylis Swarm as does the Warhound (top centre right). Then after I perform another inconsequential action, another Tactical formation advances to firefight from the upper left. I counterattack, two Hormagaunts managing to close assault the Warhound. With the cover and thick armour of the Dactylis, combined with the fact that the assaulting marines have more blast markers and my luck in rolling hits, I end up winning and forcing the Marines back.
End of two and the Tyranids are a bit exposed. Masses of Marine tanks are advancing unopposed on my right flank, and with my Hierodule refusing to rally and my Harridan dead I don't have any good way of stopping them. The downsides of taking lots of artillery is becoming apparent! My Biovores also refuse to rally.
Turn 3
Marines win Strategy Roll again. First their scouts advance towards my Blitz, shooting and killing another Biovore from the broken formation. Then the Landraiders double and crossfire the Dominatrix, getting a bit unlucky and doing no damage and only placing a blastmarker, taking it to two blastmarkers. I sustain fire with the Dominatrix, breaking the Marine Tactical Formation in the central ruins which retreats to the Marine side of these ruins.
Given the desperate nature of the situation I retain and engage the Predator Annihilators and Vindicators in a close assault with my Dactylis swarm! Now normally when Tyranids are close assaulting tanks things are very bad for the tanks indeed. However Dactylis and Termagants are pretty lame at in assaults, I have a blast marker and the Marines do not, so I'm aware that this assault will be a very close run thing. I'm relying on the Hive Tyrant, two Hormagaunts and general weight of fire to turn the tide for me. However in one of the most pathetic combat efforts yet recorded neither side causes any casualties! Combat resolution is in favour of the Marines and I break and retreat, having to intermingle with the other Dactylis formation on the hill to avoid being destroyed for coming within 15cm of a Marine unit while retreating.
The Marines take advantage of the situation, moving the Predator Destructors who shoot and wipe out the broken Biovore swarm, before the Vndicators drive through the ruins to engage the intermingled Dactylis swarms in a clipping firefight. The Harridan is within 5cm and so also gets caught up in the confusion. A Hive Tyrant dies (the one above who couldn't even kill a tank - serves him right) and I lose the firefight, retreating both swarms and the Harridan away towards the centre left ruins.
I double my infantry swarm up the left side to a crater towards one of my Take and Hold Objectives. The Marine Annihilators double and blast the Dominatrix in a another crossfire, but again Glyn is unlucky and only places a blast marker. End of turn three and the Hierodule rallies, as does my Harridan. My Dactylis swarm with Hive Tyrant also rallies and absorbs the remains of the Hive Tyrant-less Dactylis swarm. My Dominatrix fails to rally as do two Marine Tactical formations and the Warhound (sitting on two blast markers).
Turn 4
Marines win Strategy Roll again, advancing the scouts to threaten my Blitz and breaking my Dominatrix with a casual shot (was on three blast markers so only takes one more from being fired at to break her). They are joined by the Predator Destructors who open fire killing three Biovores and breaking that formation. My Dominatrix remains sitting where she is being fearless but too buffeted by fire to do anything.
The Marines may have made their first mistake with this opening move selection though, as my newly rallied Hierodule is within charge range of the Marine Landraiders...
Stomp, crash, crush! The Hierodule quickly destroys them all. This is also the Marine "Break their Spirit" objective so I achieve a victory condition instantly.
I then suppress and break the Warhound with Dactylis before it can activate and it retreats again. The Marines temporarily capture both their Take and Hold objectives, and also kill my last Harridan. They try and contest one of my Take and Hold objectives with Landspeeders which would deny me a second victory condition. However my newly rallied Dactylis swarm engages them...
and given the weight of numbers wipes them out in a firefight.
Final positions and final score 2-0 to the Tyranids.
Well that was a much closer game than the last one. Just a couple of different moves in the last turn by the Marines and it would have swung the other way I think. Shooting up the Hierodule or at least getting the Landraiders away from it, and/or positioning tanks to contest my Take and Holds objectives would have forced the game to go another turn or to victory points tally up, which I think the Marines would have won given the number of casualties I had taken. Anyway a great game that swung back and forth the whole way through, can't ask for more than that!
As to the Dactylis I'm still not sure. In this game they were certainly were not the killer formations I was worried they might be, but perhaps they could still do with a slight price increase in Synapse swarms. I will have to try them again! Tyranid War Engines are tough, but also easy to "stun" (i.e. break so they can't do anything for the turn), and the low Strategy Rating of Tyranids means opponents can often run (or in this case "drive") rings around you.
I was also quite impressed by Glyn's use of a Landraider in each Tactical and Devastator unit, adds some extra resiliency that's important in firefights, and some flexibility to what these formations can achieve.
Alright thanks for reading!


Well played Mark. Still not sure what bug is what, but well played.
ReplyDeleteYou'll have to play them and find out. :)
ReplyDelete