Another game of Epic, this time vs Andrew's Tau (which he has done some amazing work converting from various bits and pieces as described below!).
I used the Version 10.2 Tyranid List from Tactical Command, but designed the list using the Version 10.1 list at Army Forge as follows:
Hive Fleet Onachus Tyranids (NetEA v10.1 *UNDER DEVELOPMENT*)
==================================================
NEXUS SWARM [470]
Dominatrix, 2 Trygon
TYRANID SWARM (S) [200]
Two Tyranid Warriors, 6 Termagants
TYRANID SWARM (S) [200]
Two Tyranid Warriors, 6 Termagants
TYRANID SWARM (S) [200]
Two Tyranid Warriors, 6 Termagants
TYRANID SWARM (S) [200]
Two Tyranid Warriors, 6 Termagants
TYRANID SWARM (S) [200]
Two Tyranid Warriors, 6 Termagants
HARRIDAN SWARM (S) [250]
1 Harridan, 4 Gargoyles
HARRIDAN SWARM (S) [250]
1 Harridan, 4 Gargoyles
HIERODULE BIO-TITAN (745.M41) [350]
HIERODULE BIO-TITAN (745.M41) [350]
BIOVORE SWARM (M) [325]
12 Biovore

Andrew's Tau list was as follows.
Tau Third Phase Expansion (6.6 / NetEA Tournament Pack 2013)
==================================================
CRISIS BATTLESUIT CADRE [350]
4 XV8 Crisis Battlesuit, Shas'o
CRISIS BATTLESUIT CADRE [300]
4 XV8 Crisis Battlesuit, Shas'el, 2 Gun Drone units
FIRE WARRIOR CADRE [375]
8 Fire Warriors, Ethereal, Skyray
FIRE WARRIOR CADRE [325]
6 Fire Warriors, 3 Devilfish, Skyray
RECON SKIMMER GROUP [175]
4 Tetra, 2 Piranha
RECON SKIMMER GROUP [175]
Tetra, 5 Piranha
RECON SKIMMER GROUP [175]
Tetra, 5 Piranha
ORCA DROPSHIP [150]
BARRACUDA SQUADRON [150]
2 Barracuda Fighters
BARRACUDA SQUADRON [150]
2 Barracuda Fighters
TIGER SHARK SQUADRON [275]
2 Tiger Sharks, 6 Gun Drones
PATHFINDER GROUP [200]
4 Pathfinders, 2 Devilfish
PATHFINDER GROUP [200]
4 Pathfinders, 2 Devilfish

It's worth pausing briefly here to examine the marvel of conversion work that has gone into Andrew's Tau army! As can be seen, the base of it is old Eldar figures converted up for most of the infantry and vehicles, with drones made from hole punched plasticard discs and staples!

The Battle Suits suits are quite elaborate - the base of the models are old plastic Ork Dreadnoughts, with plasticard and brass components. Here's some broadside suits in progress that were not used in today's game.

Also amazing is the Orca - which Andew made from plywood using the Laser Cutter at the school he teaches at:

Of course, for those of us with less modelling talent there are now plenty of excellent figures suitable for a Tau Army if that's what you fancy. The Onslaught Miniatures Okami Technocracy range provides great looking infantry, battlesuits and vehicles. Their Avians make some fine Kroot infantry and Andrew has already bought many of these to work on as shown below. I checked them out today - lovely clean castings, I recommend them! Onslaught also makes some nice space bug Legion miniatures if you're looking for a Tyranid army. Dark Realm Miniatures Kraytonians or Microworld Games Foundationists are also worth considering if you're looking for an alternate style of grav-tank equipped tech aliens, and the Dark Realm Miniatures Skyth are another range of space bugs. Andrew also mentioned that it's probably cheaper for us in New Zealand to get Onslaught miniatures from the Exodus Wars Store due to the free shipping on orders greater than 60 pounds.

Ok enough drooling over conversions and all the exciting new miniatures ranges, on with the report!
Turn1
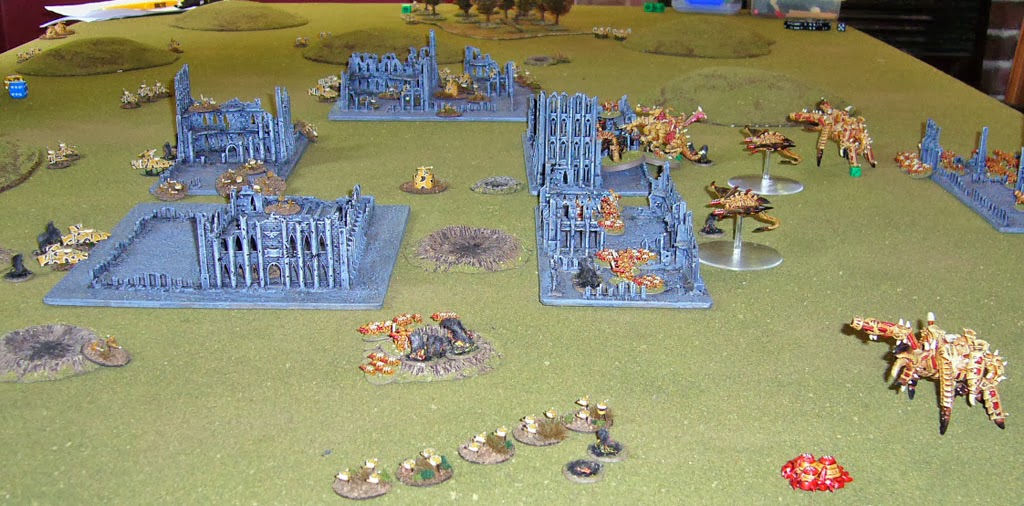
Deployment of the armies is shown in the photo below. I'm clumped to my left flank, on the right side of the photo. Andrew's Tau are spread out, with Pathfinders and Recon formations holding the central ruins and forest.

Tau win Strategy Roll, but hand the initiative to me. My Biovores open fire, killing 3 of the closest Recon formation. The remainder of the Tau Recon formation flees back towards their left flank.

I advance the rest of my formations towards the central ruins, placing a few more blast markers on garrisoned Tau, and taking blast markers in return. The Tau then launch two gutsy (foolhardy?) air transport missions. The first is the Tiger Sharks and Drones which shoot up my left flank Swarm in a crossfire, killing some Termagants and a Tyranid Warrior. In response a Hierodule moves towards them and kills one of the Drones in another crossfire.

Then the Orca and Crisis Cadre arrives and crossfire the Dominatrix, only doing a single point of damage to it however.

I move up another Swarm and engage the Crisis Cadre in a firefight with my other Hierodule. With all the support fire, the Crisis Cadre are wiped out, having only done a single point of damage to the Heirodule.

End of turn 1, and the Tyranids respawn or regenerate most of the damage they have taken. The Tau have no such luck.
Turn 2
Tau win Strategy Roll, and attempt a co-ordinated fire roll with Pathfinders and nearby Firewarrior and Crisis Cadres. Sadly for the Tau they fail the initiative test and so the Pathfinders elect to just fire at the closest swarm...

... and with their sniper ability they target and kill the two Tyranid Warriors!

My left flank Hierodule then eats the Drones, they don't taste very good, but the Tyranids don't care.

My Biovores then open fire again...

... doing no damage to the Crisis Cadre, but hitting five times and with disrupt ability, breaking the formation which retreats to a somewhat precarious postion. The Tau retaliate with Seeker missiles at my markerlit formations but to little effect. My right flank Harridan and Hierodule then move to bring the broken Crisis Cadre under fire, wiping them out and so the Tau lose their supreme commander!

I advance with Swarms of Termagants towards the Pathfinder formation blocking my left flank advance, and then engage with the Harridan and its Gargoyles in a firefight. The Pathfinders are wiped out.

End of Turn 2 and things are not looking great for the Tau, with many failed activations followed by failures to rally, on top of the loss of their two Crisis Cadre's and a Pathfinder formation. The Tyranids have lost both Tyranid Warriors from two swarms, and one of the Harridans has taken two points of damage.

Turn 3
The Tau kill my right flank Harridan, and the Orca swoops in and lands behind the forest on my side of the table to capture my right flank objective, thus denying me the "Defend the Flag" (hold my three objectives) and "They Shall Not Pass" (no unbroken enemy formations on your side of the table) objectives for this turn.

The situation continues to deteriorate elsewhere for the Tau though, with their fire pattering ineffectually off the Biotitans. The Firewarrior Cadre in the right most ruins is wiped out in a firefight with the Hierodule and supporting Swarms.

The remaining Firewarrior Cadre is then blasted by the Harridan and Hierodule, and breaks and runs. Bit of a mistake on my part as I was really hoping to engage them with the Dominatrix swarm and wipe them out with all the firefight attacks from nearby unit - thus gaining the "Break their Spirit" objective for eliminating the Tau's most expensive formation. Instead they run away and with the Ethereal they are fearless and thus won't suffer extra casualties while broken.

However, the Dominatrix manages to blast them with it's energy pulse, killing the Ethereal anyway and the remainder of the formation scatters in panic and is lost. Game is over 2-0 end of turn three, with me gaining "Take and Hold" for the holding the two Tau objectives in the ruins, and "Break the Spirit" for killing the opponents most expensive formation.

So there we are, we both agreed the Tau were too aggressive in getting close and personal with the bugs in this game and payed the price as a consequence. We have organised another game in a fortnight, and I'm sure the Tau will be trickier to see off next time!
Update! Andrew has just supplied me with this excellent "Tau Report"! Great stuff!
Update! Andrew has just supplied me with this excellent "Tau Report"! Great stuff!
Tau After Action Report 2014.01.07
Tau forces engaged a Tyranid infestation in the city ruins of Markopolis.
Advanced recon elements established sentry positions in the city before the bugs arrived. The Ethereal with his accompanying Fire Warrior Cadre established a defensive line on our Northern side of the city.
Over the course of the next two turns we established a strong position in the Eastern sector of the city. Increasing numbers of bugs drove in from the South and East. Overwhelming fire from enemy indirect fire weapons forced the Shas’o and his accompanying Crisis Suits out of the city. This entire force was wiped out when it was caught in the open en-route to their rallying point.
By the end of day the last of our forces were ejected from the city with the Ethereal gunned down by the Enemy supreme commander as he fled to the North-East.
Despite being vastly outnumbered Pathfinder units performed superbly with highly accurate sniper fire. Our more mobile Tetra mounted units failed to gain any initiative and spent the entire game in disarray around the Eastern bug objective. Ultimately they were forced to call in an Orca to land and secure the objective. The Piranha fire support teams were increasingly effective at coordinating their fire but ultimately the Seeker missiles barely scratched the hides of the Tyranid behemoths .
Extensive Air Caste support provided the one bright spot of the day when they downed a wounded enemy Harridan. Light anti-aircraft cover from the bugs meant they were able to press home attacks throughout the afternoon. We understand that there were no Air Caste casualties, for which we are grateful.
The air landing components of the Sept deployed with reckless disregard for the long term survival of the Drone elements. The Tiger Shark deployed Drones achieved a useful crossfire position but with the disrupt fire of the pulse carbines all falling on beasts the Tyranids considered expendable they did little permanent damage and subsequently succumbed to assault from a Behemoth. The Shas’el led Crisis Drones with more accompanying Gun Drones also achieved a crossfire position to the South of the city. They managed to inflict some damage on the enemy command beast but were then wiped out by a well-supported counter attack.
Senior Surviving Fire Caste Commander.
Pathfinder Shas’vre Shas’len’ra [‘Cadre Leader’ ‘cautious warrior’].
Player Notes [‘Errors’]
Placing the Shas’o Crisis Suits so far from the scene of action was silly. They should also have been within coordinated fire range of the Piranhas, just in case.
Should have used the Tetra Markerlight formation in the first activation to start putting some fire onto one of the War Engine bugs, probably a Harridan. It might have been possible to get to the Biovores.
It is now fairly firmly in my head that I need marker-lights on target to allow AT fire from the Mechanised Fire Warrior formation. Also that you need Line of Sight for Markerlight operation.
Crazy, crazy, crazy, chasing the Dominatrix with the air landing Crisis Suits.
Remember to keep the Supreme Commander re-roll for rallying broken formations. And don’t roll double ones too often when you do use it.
Felt I rolled a lot of 1s and 2s for initiative so need to keep thinking about coordinated fire missions to reduce the odds a little on this.
The Shas’o Crisis Suits were broken by indirect fire early in the second turn. Next time activate them earlier to take advantage of the Init +1. A four unit formation is fairly vulnerable to being broken by indirect fire, especially the variety that comes with Disrupt.
Did manage to use airpower to break a couple of units. The Ethereal was good for the Fearless it gave but was rather more vulnerable once Mark noticed him!!
Overwhelming victory to Mark and his Tyranids, . . .
Well done and thanks, Andrew.
Urghh, bugs! That Titan looks like a great hairy tarantella!
ReplyDeleteVery cool Taut and objective markers.
Tau, not taut! Silly auto correct!
Delete